Using a Proxy Server in your Company’s Network is one of the best decisions you have made.
But this decision can bring you some administration overhead if you don’t have an automatic way to provision the browser settings.
Fortunately, for Microsoft Operating Systems there is a way to accomplish this.
The procedure involves a configuration file that tells browsers how to connect to Internet.
This file is published via the existing Infrastructure using DNS, DHCP and a WEB Server.
Create the configuration file
Create the wpad.dat file inserting the following text:
function FindProxyForURL(url, host) {
return "PROXY 192.168.100.10:3128; DIRECT";
}
IIS
Create a new website and link it to a folder of your choice, (for instance c:\wpad). Place the wpad.dat file inside the folder.
Create a mime type for the .dat file type with the mime type “application/x-ns-proxy-autoconfig”.
Restart IIS. If you already have an IIS just place the file in the root directory.
Apache:
Create the wpad.dat file on the www directory depending on your distribution (on a Debian is /var/www/).
For instance:
#nano /var/www/wpad.dat
would open the nano editor. If nano is not install use vi or mcedit or any other text editor.
Edit httpd.conf:
#nano /etc/apache/httpd.conf
and insert the following line:
AddType application/x-ns-proxy-autoconfig .dat
Make sure apache daemon is starting at boot time, (update-rc.d apache2 defaults)
Restart apache #/etc/init.d/apache2 restart.
DHCP – Configuration for Proxy Auto discovery
(on a Microsoft DHCP server)
- Click Start, point to All Programs, point to Administrative Tools, and then click DHCP.
- In the console tree, right-click the applicable DHCP server, click Set Predefined Options, and then click Add.
- In Name, type WPAD.
- In Code, type 252.
- In Data type, select String, and then click OK.
- In String, type http://internalserver/wpad.dat where:
- internalserver is the domain name of the Server that hosts the wpad.dat file. (Alternatively you can use fully qualified domain name, (eg. http://internalserver.domain.local:3129/wpad.dat)
- Port is the port number on which automatic discovery information is published. You can specify any port number. I put 3129.
- Right-click Server options, and then click Configure options.
- Confirm that Option 252 is selected.
If you configure this on a Unix DHCP server you might need to add an extra blank character at the end of the DNS Configuration
Create an alias (CNAME) with the name wpad pointing at the webserver that hosts your wpad.dat file. For instance the alias is wpad and the fully qualified domain name is internalserver.domain.local
Troubleshooting
WPAD alias DNS entry not responding
After creating your alias when you ping wpad you get host not found this could be related to a security improvement on Microsoft’s DNS servers.
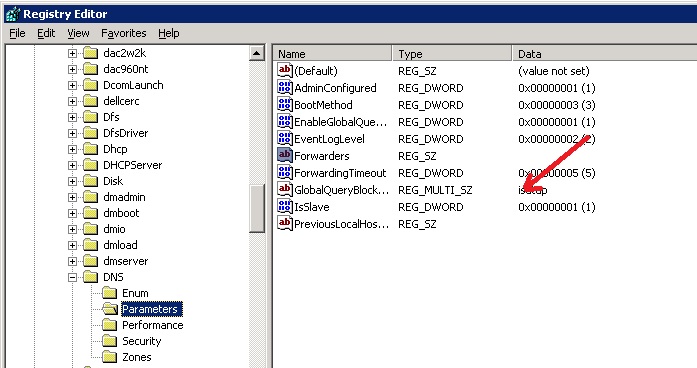
To fix this you need to edit the following registry value: HKEY_LOCAL_MACHINE\SYSTEM\CurrentControlSet\Services\DNS\Parameters\GlobalQueryBlockList
Edit this on all of your Microsoft DNS servers and remove wpad from the list of values. See the image below:
Note that this configuration requires you or your user to configure your browser to “Automatically Detect Settings”.
For Internet Explorer this can be automatically configured for all the users in an Active Directory domain via a Group Policy.
The same policy will be used by Google Chrome, which uses the Windows Internet Connection configuration.
Other browsers such as Opera, and Mozilla will have to be manually configured. Alternatively, for an automatic configuration they can be tweaked via registry hacks or configured via third party software.
The disadvantage with manual configuration is of course the cost of deployment and the fact that this can be changed by the user. If you want to enforce the use of the proxy you have to restrict the gateway access and allow only the proxy machine to access it. Another way would be to configure your proxy to be your router and set up a transparent proxy.